

Whether you’re biking to work or hitting the trails, you probably want to be comfortable — who wouldn’t? While there are plenty of comfortable e-bikes available, true comfort comes down to personalization.
People might first turn to a lush saddle or top-notch pedals to make a more enjoyable ride, but there’s something else that’s just as important (or perhaps more so): e-bike handlebar position.
You depend on your upper body to keep the bike going in the right direction, so it’s vital to ensure your hands and wrists are as comfortable as possible — and that means achieving the correct e-bike handlebar position. Making even slight handlebar adjustments can maximize riding comfort.
Read on to discover a few handlebar position tweaks that can help you enjoy your ride even more.
Understanding the Importance of Handlebar Position
The handlebar is far more than simply a place to rest your hands while riding; its position affects your posture and, therefore, your comfort. And this is nothing new. For years, studies have highlighted the physical side effects that may surface from poor handlebar positioning.
One report even found that non-traumatic bicycle injuries may occur in as many as 85% of cyclists. These include hand, shoulder, and neck injuries like median nerve palsy, often resulting from poor posture. For example, a too-high saddle or too-low handlebar can exert excess weight on the upper limbs, while hyperextending of the wrists can result in cramping, numbness, pain, and tingling — symptoms of carpal tunnel syndrome.
So what’s the solution?
Of course, you can do hand strengthening and shoulder exercises. But it’s not just about dealing with the pain. Getting the optimal handlebar setup can help you prevent that discomfort while also covering greater distances.
E-bike tweaks like amending the bar angle, saddle height, suspension, or tire pressure can avoid these damaging issues while transforming the feel of your bike. But before we get into those details, let’s explore how bike handlebars have evolved over the years.
A Brief Look at Handlebar History
Like all bicycle components, handlebars have been shaped by technological advances. Original road bikes featured rounded bars that were often awkward and uncomfortable, forcing riders to rest their hands further down the curve and away from the brakes.
American rider Marshall ‘Major’ Taylor changed the handlebar game in the 1890s, using a drop bar and adjustable stem to achieve a more aggressive low-riding position. Manufacturers then redesigned bikes to make them more comfortable by placing brakes and shifters closer together, making brake levers larger, and even switching to thicker, more padded handlebars for riders who want to sit upright.
Technology increased through the 2000s, bringing the rise of compact frames that encouraged shallow drop bends. Companies like Specialized e-bikes and Trek have developed integrated handlebars that can’t be replaced by other brands. And we’ve seen drastic designs like the much-discussed double-decker handlebar featured on Canyon’s Grail bikes in 2018.
In other words, bike brands — both traditional and electric — are constantly adjusting handlebars to offer as much comfort as possible.
Handlebar Position: Traditional vs. E-Bikes
The main difference between traditional and e-bike handlebars is the addition of features like sensors and an electronic LCD display. Some models, such as Class 3 e-bikes, may also have handlebars designed to improve aerodynamic efficiency to help the bikes reach higher speeds than traditional bikes.
The good news is that even with these added handlebar components, you can still adjust e-bike handlebars to enhance your riding comfort.
How Handlebar Position Affects Comfort
Let’s get one thing straight: E-bike comfort depends on the individual rider and their preferred style — and sometimes comfort needs to move down on the priority list to make room for improved maneuverability and speed.
Take a downhill racer, for example. They probably prefer a lower, more aerodynamic position than a casual rider enjoying a ride by the seaside or doing a grocery run. The racer may not be as cushy as the casual rider, but that’s okay. There are still ways to adjust the handlebars for better comfort without completely compromising speed.
Before we dive into the specific adjustments, here’s a run-down on the different e-bike handlebar types and how they affect overall comfort:
- Flat Handlebars: Flat bars sit level with your saddle, making the e-bike more comfortable to ride and easier to control both off- and on-road.
- Drop Handlebars: Drop handlebars offer optimal comfort for riders in search of speed, agility, and riding efficiency. These bars provide an aerodynamic position and a low center of gravity that’s ideal for hitting top speeds, whizzing through traffic, or navigating winding roads. However, drop bars can increase stress on the back and shoulders, so proper body alignment is crucial to preventing injury and maintaining maximum comfort.
- Riser Handlebars: These sit slightly higher than flat bars, enabling you to sit up a little straighter while retaining control. Riser bars are particularly popular with riders who need a comfortable position due to physical limitations or injuries. However, this can significantly affect your bike’s handling and general feel, so test the bars out before committing to them for longer rides.
How to Set up Handlebars for Comfort
Setting up the handlebars on your e-bike is all about what feels right for you. Check out the following adjustments to help you find the perfect fit.
1. Consider Handlebar Width
The right handlebar width is one of the most critical adjustments you can make to your e-bike. Aim to have your hands shoulder-width apart while resting on the hoods.
If your hands are any farther apart, you may be forced to lean forward and potentially experience pain while riding. On the other hand, if your hands are too close together, it may restrict airflow to the lungs and affect your climbing ability.
Aluminum handlebars can be shortened using a hacksaw or a pipe cutter, alongside an e-bike accessory like a Park Tool saw guide. Carbon handlebars can be shortened using a hack saw with a carbon-specific blade and the Park Tool saw guide. We recommend starting out with 800 mm handlebars and then cutting them in 10 mm increments after every couple of rides. Some handlebars, such as the Renthal Fatbar Carbon, provide markings to help you easily cut the bars to size.
2. Factor in the Hand and Wrist Angle
A neutral hand and wrist angle can help you avoid serious injury and achieve the most comfortable ride. Try rotating the handlebars by loosening the four bolts on the stem. Changing the angle may result in some aerodynamic loss but deliver a comfort boost that helps you get back out on the bike more often.
3. Adjust the Stem and Saddle Height
A lower handlebar height typically reduces the rider’s center of gravity by placing more weight onto the front wheel and increasing traction. Lowering the handlebar height also provides a more central position between the wheels, which helps boost bike control while off-roading or hill climbing. Keep in mind, though, that going too low can affect handling, especially on steep climbs.
Some manufacturers provide adjustable stems but experimenting with the height is relatively easy using tools like Allen keys, torque wrenches, or Torx keys.
Here are some options for adjusting the height of your handlebars:
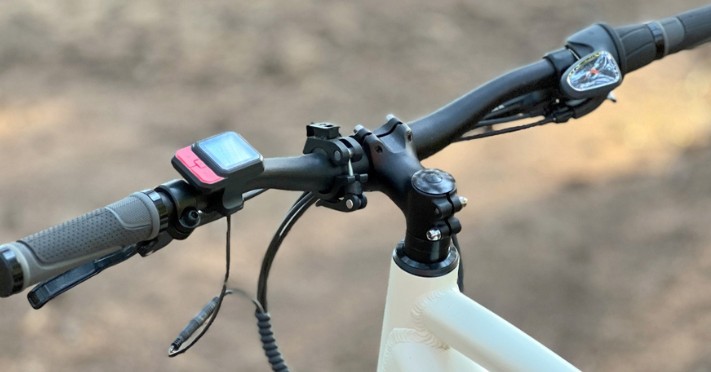
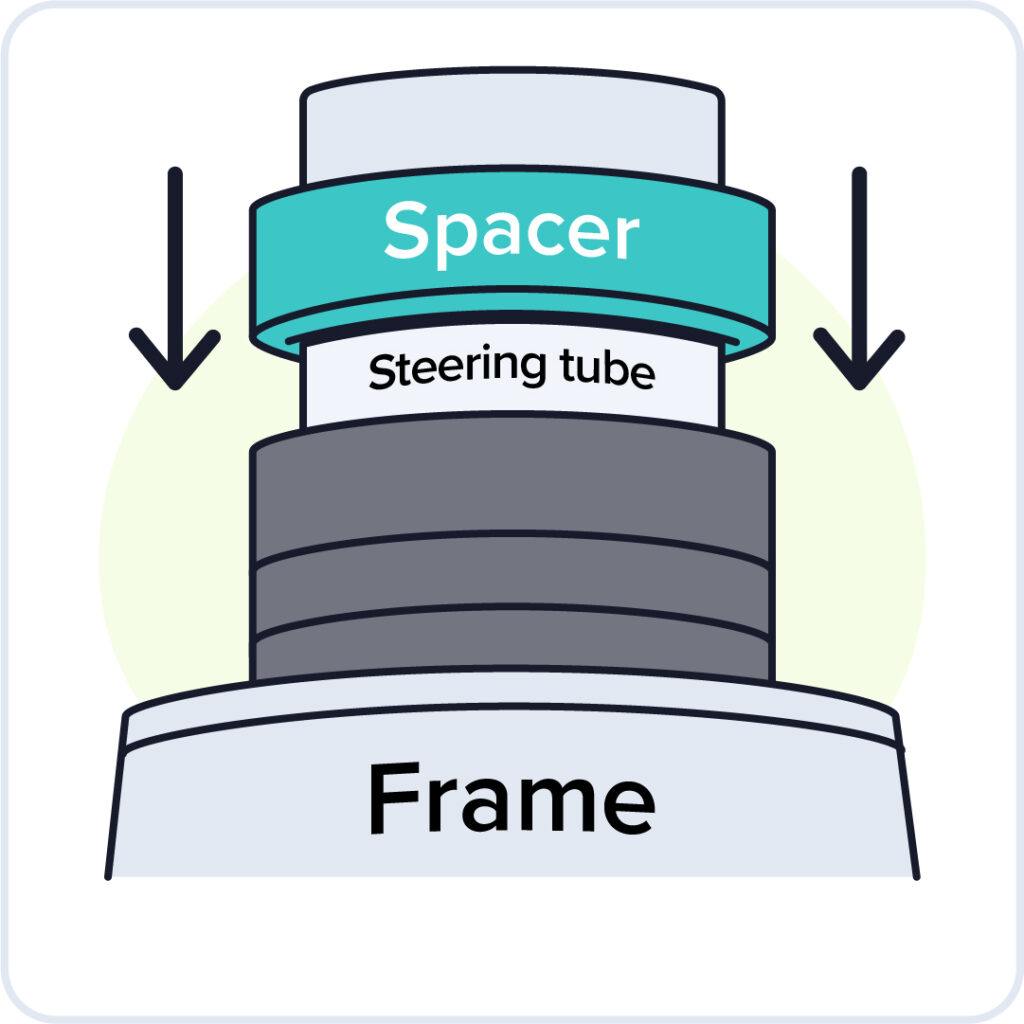
- Move Headset Spacers: You can boost comfort by removing the headset spacers, located on the fork’s steerer tube. Simply loosen the clamp bolts on the stem’s rear, remove the cap on top of the stem, and slide the stem off. You can then lower or raise the bar and move the spacers before replacing and tightening up the stem and spacers.

- Add Headset Spacers: You can also increase e-bike comfort by adding spacers between the stem and headtube. This typically results in a more upright riding position, taking pressure off your hands, shoulders, and wrists.
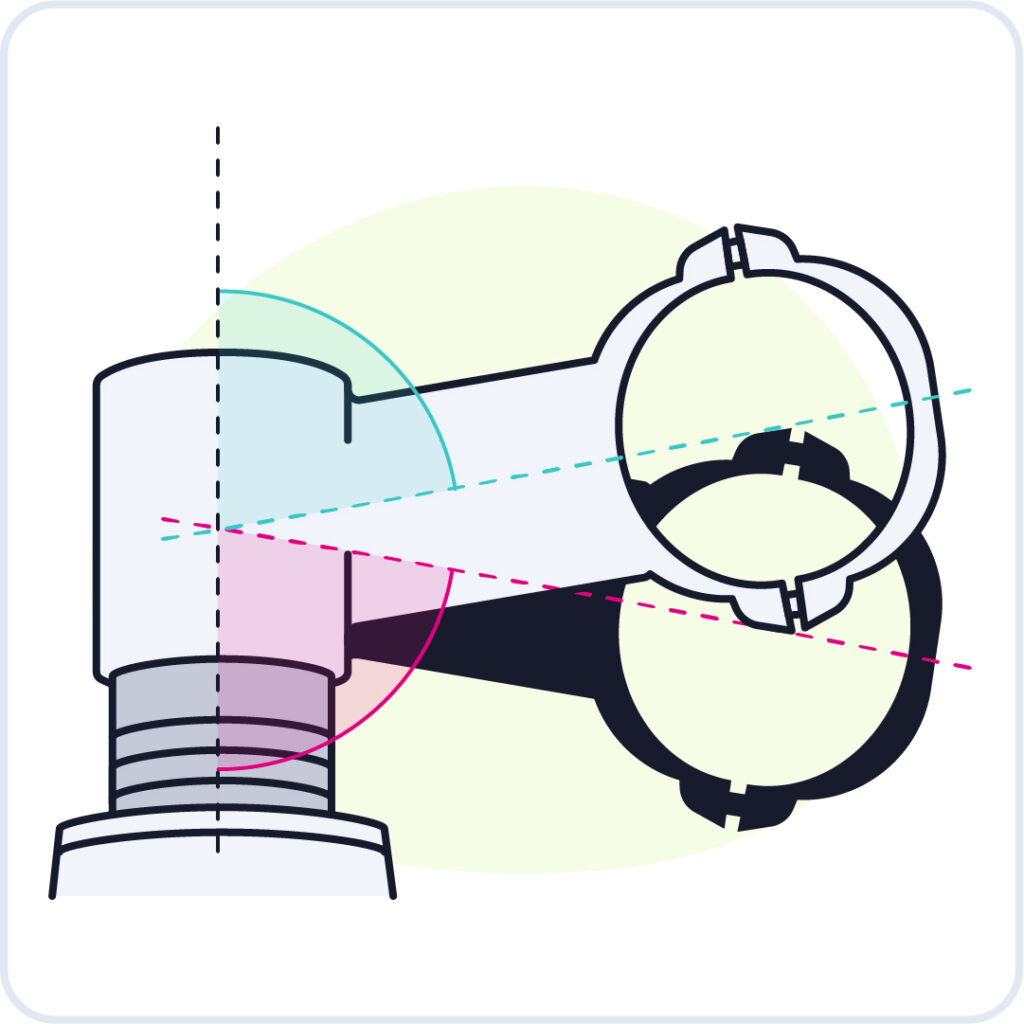
- Flip the Stem: You can also flip the stem upside down to gain a more aerodynamic position. Most stems have a positive angle from the base to the handlebar bracket, so flipping the stem upside down flips it to a negative angle. Start with undoing the bolts that attach the handlebar to the front of the stem and rest the handlebar on the tire. Then undo and remove the top cap bolt before loosening the stem bolts. This allows you to remove the stem, flip it over so that the top of the stem is now on the bottom, and reinstall the handlebar.
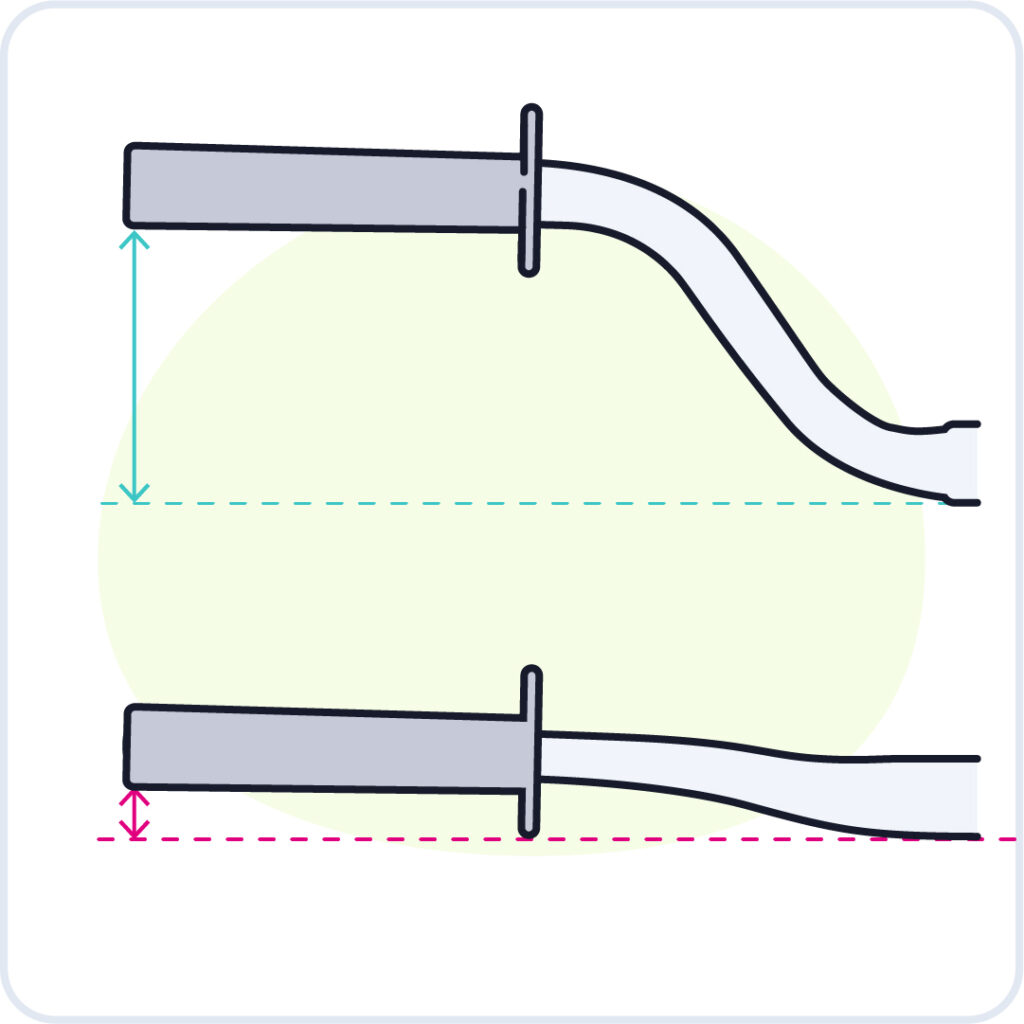
- Raise the Handlebars: Bicycle stems come with different amounts of rise (the angle of the stem relative to the steerer tube). The rise often ranges between six and 20 degrees, allowing you to change the height of your handlebars. The height can also be modified by installing a stem riser (an attachment that fits to the fork steerer), but this can increase the strain on the bike.
4. Boost Your Reach
Reach refers to how far forward the handlebars extend, measured from the center of the stem to the center of the handlebars at the furthest forward point. Road or racing e-bike users may prefer a longer reach (120-140 mm), while endurance, leisure, or older cyclists might want to shorten the reach by 20-30 mm for greater comfort.
5. Get the Right Handlebar Grip
Another critical factor in your e-bike comfort is the handlebar grips. The ideal grip, of course, depends on personal preference for width, thickness, style, and compound. There are also different styles of grip, such as foam, rubber, and silicone, that can also help with issues like carpal tunnel syndrome and sweaty hands.
When it comes to maximum grip, we recommend looking at an option like the Ergon GP1 Ergon Evo handlebar grips.
What About eMTBs?
We’ve covered handlebar setups for downhill, leisure, and racing e-bikers, but what about electric mountain bikes (eMTBs)? They have a unique build that may feel comfortable in a showroom but all wrong when you hit the trails and tackle more demanding terrains.
You need just the right handlebar position for the most comfortable experience on tricky terrains. Here are some handlebar adjustment tips to consider:
- What Not to Do: Try to avoid setting the handlebars too high. This can make eMTB riding difficult since it’s hard to hinge forward and keep the front wheel grounded on steep climbs. It also makes tricks like manuals and wheelies more challenging and can push your body weight too far back on the bike while descending. On the other hand, bars set too low may cause back pain and make it difficult to look ahead down the trail.
- What to Do: Try to find a neutral but dynamic position that enables you to ascend easily and handle anything the trail throws at you.
Gain Maximum Control on Any Bike and Terrain
The perfect e-bike handlebar position and setup often boils down to personal preference, based on the terrain and your riding style. Minor adjustments to the ride height, saddle height, handlebar position, and grips can deliver huge comfort benefits.
The more comfortable you feel on your e-bike, the more you’ll enjoy getting out on two wheels — whether that’s cruising along the seafront or tackling the most challenging mountain ranges.